Students, please read Getting Help through the Office Hours Queue and Instructors, please Enable and Configure the Office Hours Queue.
What is the Office Hours Queue?
In large courses with busy TA/instructor office hours or drop in tutoring sessions, it is important to help students efficiently and fairly, in a first come, first served manner. Each course on Submitty can enable one, or multiple, web-based help queues.

This web-based queue replaces a system that involved students writing their name on a piece of paper or whiteboard or at the front of the room. The queue ensures fair access to course resources. Students cannot abuse the web-based queue by cutting in line or using a pseudonym to write their name in the queue more than once. Furthermore, it is particularly helpful for students with physical disabilities or social anxieties that may want to avoid drawing attention to themselves.
When to use the Office Hours Queue
The office hours queue is ideal for situations where there is a constant flow of students needing individualized help from one or more TAs/instructors. The queue helps manage the students waiting to be helped as well as the students currently being helped. We store all relevant timestamps for each entry in the queue. Usage statistics can be tracked, analyzed, and instructional resources balanced appropriately.
Creating a New Office Hours Queue
All users with limited access grader privileges or higher may access, create, and manage office hours queues for this course.
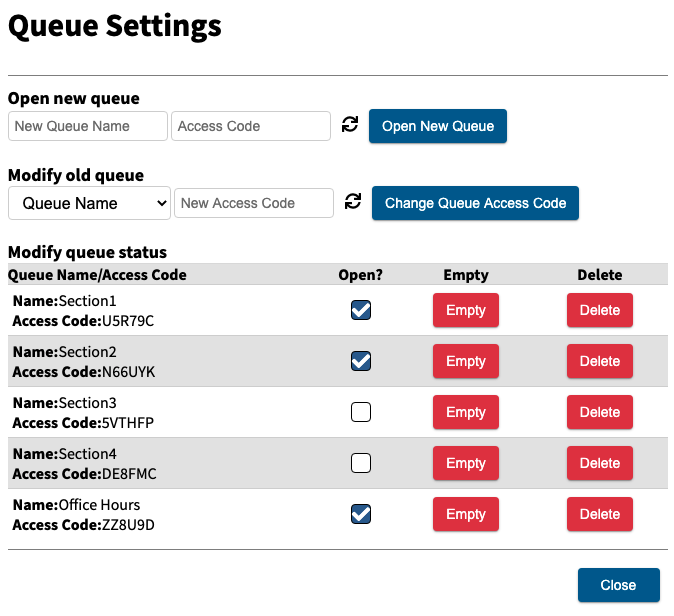
To create and open a new queue you need click “Queue Settings” button. Then, enter a unique name for the new queue. If your course has multiple recitation or laboratory sections, you may want to make a separate queue for each section/room. You may also want to make different queues for the type of assistance needed (e.g., help, checkoff, code debugging, lecture material, etc.), as appropriate for your topic and course structure. Note: A student may only join one office hours queue at a time!


Often it is helpful to require that students be present in the tutoring room prior to joining the queue. To enforce this policy, each queue has an access “code”. You can post this access code at the front of the room, so only students in the room know the access code and can enter the queue. Then select “Open New Queue”.
The access code of an existing queue can be changed or re-randomized at any time by selecting the refresh icon to the right of the access code or you may set your own access code, as desired. Then press “Change Queue Access Code”.
Managing an Existing Office Hours Queue
When the designated office hours or tutoring session is complete, the TA/instructor should close the queue to prevent additional students from joining the queue. Click “Queue Settings” and then uncheck the desired queue. Closing the queue does not delete it; rather, the uniquely named queue is available to be re-opened and re-used tomorrow or next week!
All students who entered the queue before it was closed will remain in the queue and can be helped. Alternatively, the TA/instructor may remove all students from the queue by pressing “Empty Queue” or press “Delete Queue” to remove students from the queue and delete the queue.
In the example above, Section1, Section2, and Office Hours are open and Section3 and Section4 are closed.
Filtering Office Hours Queues
In a large course with multiple active/open queues and multiple TAs/instructors helping students, it is typical to assign some TAs/instructors to focus on specific queues. Each TA/instructor can filter the queue of all students waiting for help by clicking the queue button in the row of queues. A filled in queue button means that the students in that queue will be shown in the list of all students, and a colorless queue button means that the students in that queue will be hidden in the list of all students.
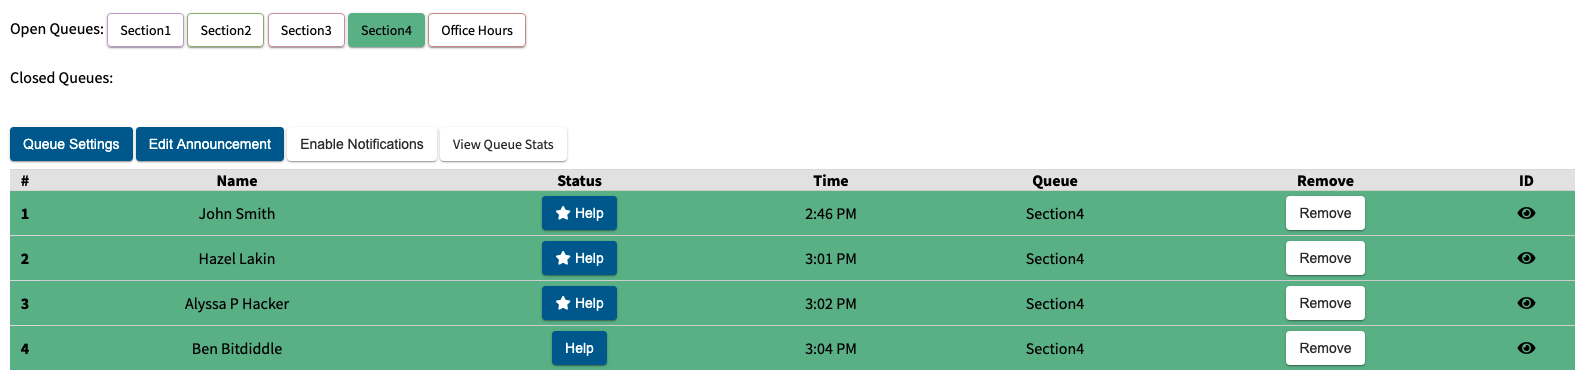
In the example above, only students in the Section4 queue are displayed.
Helping Students in the Office Hours Queue
The queue is sorted chronologically by timestamp of student entry into the queue. Typically, the instructional staff will prioritize the queue chronologically, helping the student at the top of the list. To start helping a specific student in the queue, press the “Help” button for that student.

NOTE: Students who have not been helped yet this week (the last 5 days) through this specific queue will appear with a star next to the blue “Help” button. If a student has not been helped yet today, but has been helped in the last 5 days a half star will be displayed. In the example above, Hazel and Alyssa have not yet been helped this week (at least not through the Section4 queue), but Ben has already been helped at least once today. To fairly distribute tutoring resources, the instructional staff may adopt a policy whereby starred and/or half starred students are prioritized, even if they are not the student who has been in the queue the longest.
Once you have started helping a student, the status button for that student will switch to a green “Finish Helping” button. Also the “Time” column will switch from the wall clock time when the student entered the queue, to a minutes and seconds timer (m:ss) indicating the length of time that you have been helping that student. This information will be helpful in busy office hours with limited instructional staff. The TAs/instructors may set a policy with a maximum time limit for help/tutoring per student.

Note: If there are multiple TAs/instructors staffing the office hours queue, your display will show a blue “Finish Helping” button for students being helped by other TAs/instructors.
When you have finished helping a student, press the “Finish Helping” button. If you forget to click this button to remove the student from the queue, they can exit the queue from their own interface.
Note about Student Privacy
When students join the queue, they may specify an alternate name – different from both their legal/registration name and their preferred name. The queue name is the name that the TA/instructor will call out aloud in the room, if they do not know the each students by name/face. The TA/Instructor also has access to view the student’s user id by clicking the eye icon.
Office Hours Queue History and Statistics
The bottom of the page shows the most recent events in the queue from the current day. As desired, you can click to view all queue events from the current day. The history displays who was helped, how long they waited before help arrive, the length of time they were being helped, and who helped them. The history includes an option to the student to the queue if they were accidentally removed.
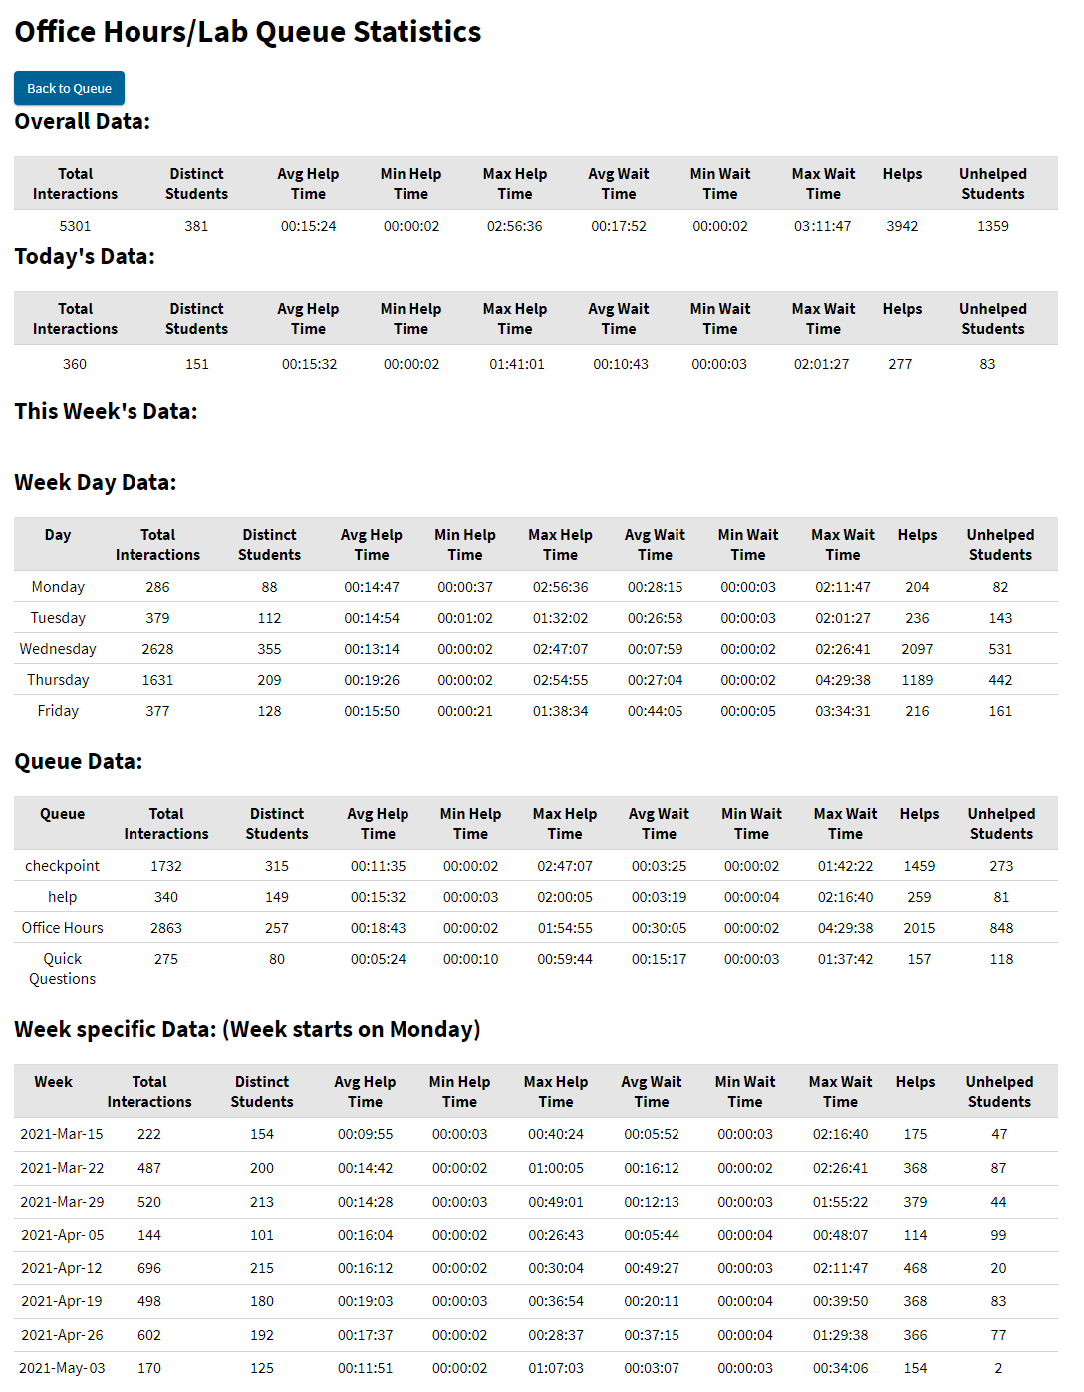
Students, graders, and instructors can view data on the office hours queue by clicking the “View Queue Stats” button in the Office Hours Queue page.

The statistics page displays summaries of the daily, weekly, and total interactions in the different queues a course has.