Create a New Gradeable
To create a new gradeable, instructor users should click “New Gradeable” in the sidebar on the left of the screen. Either Upload a JSON file, or fill out this form (details in the following sections) and press “Create New Gradeable”.
Most of the fields on the Create/Edit Gradeable form can be changed later. You can return to this form from the main page by pressing the “Edit” button at the end of the row for this gradeable. Two fields cannot be changed after the initial gradeable creation:
-
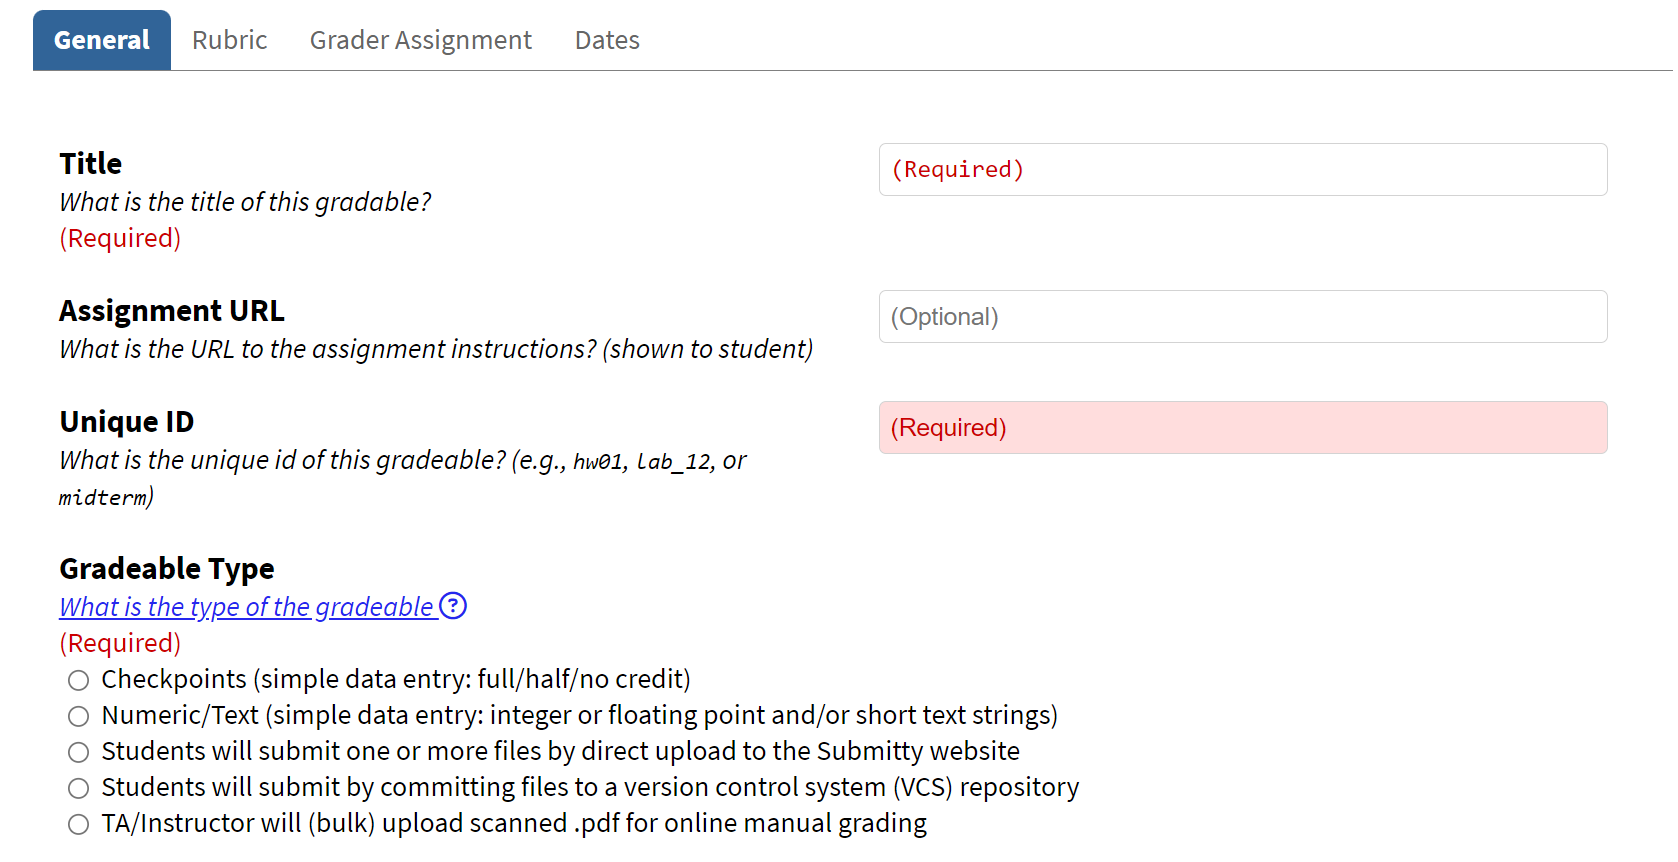
Unique id of the gradeable. This id should not have spaces. This id will be used as the name of the subdirectory storing files for this gradeable, etc. We suggest “hw01”, “lab_12”, “midterm”, “lecture_quiz_2a”, etc.
-
Type of gradeable (more details below)
IMPORTANT NOTE: You should not change the TA Grading rubric after TAs have started grading!
Types of Gradeables
A “Gradeable” is any single item that will be graded automatically and/or manually by the instructor/TAs.
Checkpoints should be used for manually graded items with one or more parts that are marked as full, half, or no credit. This is commonly used for in class exercises (e.g., lab or recitation) where the TAs verify the students have completed the exercise and demonstrated sufficient competency with the material. Similar to numeric gradeables, we provide a spreadsheet-like interface for manual data entry.
Numeric is used for data entry of quizzes or exams where the scores for each student are a simple array of one or more numbers (possibly with a short text comment). We provide a spreadsheet like interface for manual data entry of the numeric scores per problem that are summed for a total score. Or you can just enter the total score as a single column. We also provide a .csv upload if your numeric scores for this gradeable are already in an electronic format.
Student File Submission There are two types of gradeables where students can submit their files to Submitty: directly uploading to the website, or submitting the files using a version control system (VCS). These should be used for homework/project/exercise where students will directly upload files (e.g., code, pdfs, images, etc.) to Submitty for grading. (For help with VCS gradeables, view Submission via Version Control ).
TA/Instructor Upload should be used when a TA or instructor will (bulk) upload assignments to Submitty for grading.
Autograding Configuration Path
For Electronic File uploads you must specify the full path to the autograding configuration config.json file stored on the submission server. (More details on the Assignment Configuration page.)
If you do not need any automated testing or grading; that is, if you are collecting files for the TAs to fully manually grade, choose the “no autograding” sample assignment configuration:
/usr/local/submitty/more_autograding_examples/upload_only/config/
Gradeable Dates & Times
From the create/edit a gradeable page you can specify (or change):
-
the date/time the homework assignment should open to receive student submissions,
-
the due date/time (plus allowed “late day” submissions),
-
the date/time the system opens to allow TAs/mentors/graders to grade, and
-
the date/time that the TA/mentor grades will be released to students.
-
the date/time the student can start making grade inquiries, if grade inquiry is enabled for the gradeable.
Grading User Groups
Grading permission denotes the lowest privileged user that may grade the gradeable. Grading permissions fall into 1 of 4 categories.
-
The highest privileged is “instructor” (1), who has unlimited access.
-
Then next highest is “full access grader” (2), who can view and edit grades for all sections.
-
The third highest is “limited access grader” (3), who can only see and grade sections or gradeables they are assigned to.
-
The least privileged user is “student” (4), who has no access to grading.
Both full access graders and limited access graders are assigned sections of students to grade for each gradeable (by registration or rotating section, see below). When these users log in to the system they are presented with only the grading work they have not yet completed. The difference between these grading types is that full access graders can navigate to inspect or regrade any student for that gradeable (even sections they are not assigned). Limited access graders are restricted.
Grader Assignment Method
Grader Assignment Method can be chosen for each gradeable. It specifies the set of students assigned to each grader.
-
Gradeables set to All Access Grading (0) give all graders with sufficient permission access to all student submissions.
NOTE: This is the same as selecting “Rotating Section” and assigning all sections to every grader.
-
Gradeables set to Registration Section (1) assign a fixed set of one or more graders per section across all gradeables for the entire term. For example, grader John is assigned to registration sections 1 and 2. For gradeables “g1”, “g2”, “g3”, which are graded by registration section, John will always grade the same set of students, those assigned to registration section 1 and registration section 2.
NOTE: Typically registration section grading should be used for lab checkpoint data entry, and exam data entry.
-
Gradeables set to Rotating Section (2) allow for a grader to be assigned a different set of students per gradeable. For example, gradeables “g4”, “g5”, “g6”, are graded by rotating section. For “g4” John may be assigned to grade users in rotating section 3, for “g5” he may grade users in rotating sections 1 and 2, and for “g6” he may not be assigned any rotating sections.
NOTE: Often rotating section grading is useful for homework grading. This way each student receives feedback from multiple TAs throughout the term. It can even out differences in grading between the TAs and is perceived by the students as being more fair (you’re not always graded by the “mean” TA).
Build/Debug all Grading Configurations
After adding one or more new electronic submission gradeables, or if you have modified any of the assignment configuration files, the configuration must be built or re-built. If you are using a system-wide sample configuration or if you are using a configuration you uploaded through the website, the build will happen automatically after you create or edit the gradeable.
However, if you have specified a configuration in a private course repository, (see Assignment Configuration page) you must re-run the BUILD_XXXX.sh script.
-
Log in to the server. Navigate to your top level directory, e.g.
/var/local/submitty/courses/s17/course_01/ -
Run the script, e.g.:
./BUILD_course_01.shTo re-build only a single gradeable, you can specify that gradeable id as an optional argument. E.g.:
./BUILD_course_01.sh hw01 -
Fix any errors in your configurations, and re-run as necessary.
Test your Assignment Configurations
-
To manually test your course and assignment configurations, follow the student submission instructions
-
You can confirm that the files were received by checking this directory:
/var/local/submitty/courses/SEMESTER/COURSE/submissions/ASSIGNMENT_ID/USER_ID/VERSIONFor direct file upload submissions (single file or .zip) this directory will contain all submitted files and any directory structure contained in the zip file. In addition to the submitted files, in that directory you will also find a
.submit.timestampfile. This is the time of submission, not the time that automated grading started/finished.For submission via VCS, this directory will only contain the
.submit.timestampfile. This timestamp will be used to retrieve the state of the repo at the time of submission. -
For VCS submissions, you may also inspect an archive of the files/directory structure VCS repo at submission time in this directory:
/var/local/submitty/courses/SEMESTER/COURSE/checkout/ASSIGNMENT_ID/USER_ID/VERSION -
Once automated testing & grading has completed, you can inspect some behind the scenes details of the automated grading by looking in this directory:
/var/local/submitty/courses/SEMESTER/COURSE/results/ASSIGNMENT_ID/USER_ID/VERSIONIn this directory you will find the
results_grade.txtsummary of the automated grading results, and STDOUT, STDERR, execution logfiles for each test case. You will also find log files for the compilation, runner, and validation components of automated grading that are helpful in debugging assignment configurations.
Download Gradeable as JSON
You can download the JSON representation of your gradeable by clicking the ‘Download Gradeable Json’ button at the top right of the ‘Edit Gradeable’ screen. This JSON file can be re-uploaded into a new course to use the same parameters as the existing gradeable.
Below is the list of parameters downloaded. VCS and Team Gradeable are only downloaded if the gradeable is using them.
{
  "title": "Example Json",
  "instructions_url": "",
  "id": "Example ID",
  "type": "Electronic File",
  "vcs": {
    "repository_type": "submitty-hosted",
    "vcs_path": "http://localhost:1511/path/to/repository",
    "vcs_subdirectory": "subdirectory"
  },
  "team_gradeable": {
    "team_size_max": 3,
    "inherit_from": "gradeable_id",
  },
  "bulk_upload": false,
  "grading_inquiry": false,
  "grade_inquiry_per_component_allowed": false,
  "ta_grading": false,
  "discussion_thread_id": "thread_id",
  "syllabus_bucket": "homework",
  "autograding_config_path": "path/to/config",
  "dates": {
    "ta_view_start_date": "2024-1-10 23:59:59.00",
    "submission_open_date": "2024-1-10 23:59:59.00",
    "submission_due_date": "2024-2-10 23:59:59.00",
    "grade_start_date": "2024-2-10 23:59:59.00",
    "grade_due_date": "2024-3-10 23:59:59.00",
    "team_lock_date": "2024-1-10 23:59:59.00",
    "grade_released_date": "2024-3-10 23:59:59.00",
    "grade_inquiry_start_date": "2024-3-10 23:59:59.00",
    "grade_inquiry_due_date": "2024-3-10 23:59:59.00",
    "has_due_date": true,
    "has_release_date": true,
    "late_days_allowed": true,
    "late_days": 3
  }
}