A Submitty instance is capable of leveraging additional machines to distribute autograding load. This capability can be used to ship jobs which require additional resources or specialized hardware to appropriate machines. This guide details the steps to install Submitty in worker mode, and to configure the resulting worker machine for use by a “Primary” Submitty instance.
Note: We assume that you’re installing Submitty on a dedicated machine. If this machine is used for other things, you may need to adapt the instructions below and install_system.sh for your needs (as the script installs all of the dependencies that Submitty depends on).
Note: These instructions should be run under root/sudo.
-
Create a
submittyuser on the machine. You may choose a different user name, but the user should only be used for submitty autograding. -
Install git
sudo apt install git -
After installing the operating system, clone the git repository:
mkdir -p /usr/local/submitty/GIT_CHECKOUT
git clone https://github.com/Submitty/Submitty.git /usr/local/submitty/GIT_CHECKOUT/Submitty
Ensure
/usr/local/submitty/GIT_CHECKOUT/Submittyis owned by thesubmittyuser. Thesubmittyuser should be able to read/write to this directory. -
Run the automated portion of the install, using the
--workeroption.cd /usr/local/submitty/GIT_CHECKOUT/Submitty bash ./.setup/install_system.sh --workerYou will be asked to provide the name of your submitty user by the CONFIGURE_SUBMITTY.py script.
-
Add the submitty user to the
submitty_daemon,submitty_daemonphp, anddockergroups. And add thesubmitty_daemonuser to thedockergroup.sudo usermod -a -G submitty_daemon YOUR_SUBMITTY_USER sudo usermod -a -G submitty_daemonphp YOUR_SUBMITTY_USER sudo usermod -a -G docker YOUR_SUBMITTY_USER sudo usermod -a -G docker submitty_daemon -
Next, we must set up an ssh key so that submitty_daemon user on the primary machine can copy files to our worker machine.
On primary submitty:
NOTE: ssh-keygen asks for the name of your submitty user.
NOTE: The ssh-copy-id line requires a replacementsu submitty_daemon cd ~/ ssh-keygen ssh-copy-id -i ~/.ssh/id_rsa.pub SUBMITTY_USER@HOSTNAME - Finally, we must add the machine to the list of workers available to our
primary machine. To do this:
- Log on to the primary Submitty machine.
- Open
/usr/local/submitty/config/autograding_workers.jsonwith your favorite text editor. - Add a new entry with a unique key.
- add at least one capability to the capabilities list. This capability will determine which jobs should be shipped to this machine. See also Automated Grading - Multiple Physical Servers
- Add the ‘address’ of the machine to the address field (e.g.
worker1.myuniversity.edu). - Add the number of autograding workers (simultaneously processed jobs) for the machine.
- Add the name of the submitty user on the machine as the username.
- Set the machine to be enabled.
-
Run
/usr/local/submitty/.setup/INSTALL_SUBMITTY.shon primary machine so that the changes take effect. - Inside of your assignment configurations, you may now add the line
required_capabilities : 'CAPABILITY'to ship your jobs to a worker with the capability CAPABILITY.
Configuring SSH Access
-
If your worker machine is directly accessible from the primary machine via an IP address in the public DNS servers, you may specify that machine by IP address or by name in the
/usr/local/submitty/config/autograding_workers.jsonfile. E.g.:"worker1": { "capabilities": [ "worker","worker1","default" ], "address": "1.2.3.4", "username": "submitty", "num_autograding_workers": 5, "enabled": true }or
"worker1": { "capabilities": [ "worker","worker1","default" ], "address": "worker1.myuniversity.edu", "username": "submitty", "num_autograding_workers": 5, "enabled": true } -
If the machine name is not in the DNS server, you may add a line to the
/etc/hostsfile on the primary machine linking a name of your choice to the IP address of the worker machine:1.2.3.4 worker1.myuniversity.eduAnd then you can use the machine name in the
autograding_workers.jsonfile. -
For security, you will probably want to restrict unwanted connections to the worker machine. You can do this by first adding the following line to the
/etc/hosts.denyfile on the worker machine:sshd : ALLAnd then allow connections from the primary machine, by adding the following line to the
/etc/hosts.allowfile on the worker machine:# primarysubmitty.myuniversity.edu sshd : 5.6.7.8 -
Test and confirm that the ssh key (previous instructions) is working and that the
submitty_daemonuser on the primary machine can connect via passwordless ssh to the worker machine using thesubmittyuser.
SSH Access via ProxyJump
If a worker machine must be accessed through an intermediary (e.g., it does not have a its own public facing IP address), you can configure indirect access to the worker machine as follows:
-
Specify this indirect connection for the
submitty_daemonuser on the primary machine by adding the following lines to the/home/submitty_daemon/.ssh/configfile:Host worker2.myuniversity.edu User submitty ProxyJump submitty@worker1.myuniversity.eduIn this example, worker2 does not have its own public-facing IP address, but can be reached by going through worker1 as intermediary.
-
Set up an ssh key (see instructions above) from the
submittyuser onworker1.myuniversity.eduto thesubmittyuser on theworker2.myuniversity.edumachine. -
Test and confirm that the
submitty_daemonuser on the primary machine can connect via passwordless ssh to both theworker1.myuniversity.eduandworker2.myuniversity.edumachines (as thesubmittyuser). -
You will also need to enable this connection for the root user (using the
submitty_daemonuser ssh keys) by adding the following lines to the/root/.ssh/configfile:Host worker1.myuniversity.edu IdentityFile /home/submitty_daemon/.ssh/id_rsa Host worker2.myuniversity.edu User submitty ProxyJump submitty@worker1.myuniversity.edu IdentityFile /home/submitty_daemon/.ssh/id_rsa -
Test and confirm that the root user on the primary machine can connect via passwordless ssh to both the
worker1.myuniversity.eduandworker2.myuniversity.edumachines (as thesubmittyuser). -
Test the autograding of a submission that is targeted to a capability provided (only) by this worker machine.
Graphics Application Worker Machines
-
Install these additional packages on worker machines that will be autograding graphical applications. These packages will allow window and mouse control, screenshots, and image processing.
sudo apt-get install wmctrl sudo apt-get install xdotool sudo apt-get install scrot sudo apt-get install imagemagick -
To launch and screen capture graphics programs, it is necessary that a user (any user) be logged in to the machine. Note that while autograding is in progress, the mouse and keyboard will be captured and controlled by the remote submitty process, so interactive usage of the machine will be disrupted. For security, we suggest that this be the
submittyuser or other user with no access to sensitive data external to Submitty. -
Configure that user’s account so that the machine does not go to sleep, the screensaver is disabled, the screen does not lock (requiring a password to unlock), the screen does not go black, and the monitor does not go into power saving mode.
Here are some of the settings to try:
-
Settings -> Power -> Power Saving -> Blank Screen = Never -
Settings -> Power -> Suspend & Power Button -> Automatic suspend = Off -
Settings -> Provacy -> Screen Lock = Off
If the above settings do not work on your system, you may also need to install and run Caffeine:
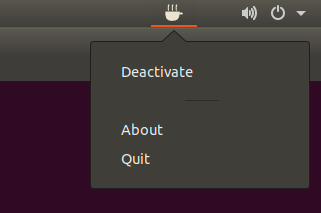
sudo apt update
sudo apt install caffeine
sudo apt install caffeinate
sudo apt install caffeine-indicator
Then, make sure that Caffeine is activated: Click on the coffee cup icon in the top Ubuntu bar and make sure it is activated. Each time you restart the computer or switch users, make sure that you still have Caffeine activated.
NOTE: Once you’re sure that the machine blank or put the display to sleep, you can probably shut off the monitor using its physical switch when you aren’t using it.
-
-
The
untrusteduser for autograding needs access to the X Server / X Window System. You can do this for the current user and current session by typing:xhost +SI:localuser:untrusted00Note: It is necessary that this command be run every time the computer is rebooted, for whichever user is logged in. It might be easiest to automate this by editing the
/etc/profilefile (as root) and adding these lines at the bottom:# SUBMITTY AUTOGRADING OF GRAPHICAL PROGRAMS # ALLOW REMOTE LAUNCH OF X WINDOWS if [ "$DISPLAY" != "" ] then xhost +SI:localuser:untrusted00 fi -
Determine the value of the DISPLAY environment variable on the graphics worker machine. From a interactive terminal on that machine (not a remote login), type:
echo $DISPLAYwhich should print
:0or:1for example. Note: The value will depend on the number of graphics cards and outputs of those cards and it may change if the system hardware or drivers or physical connections are modified. -
Test that you can remotely launch a graphical program on the worker machine from another computer. From a terminal on another computer, connect via ssh to the worker machine. Type:
export DISPLAY=:0Replacing
:0with the value found in the previous step as necessary.Then run a command in the remote terminal that will open a graphical window on the worker machine.
-
Now enter the value of the DISPLAY environment variable in the
autograding_workers.jsonfile on the primary Submitty machine:"graphicsworker": { "capabilities": [ "graphics", "default" ], "address": "graphicsworker.myuniversity.edu", "username": "submitty", "num_autograding_workers": 1, "enabled": true, "display_environment_variable" : ":0" }Again, replacing
:0with the value found in the earlier step. -
Finally, test the autograding of a graphical program. It is useful for debugging to watch the monitor and confirm that the graphical program window is successfully opened, and the mouse and key actions are performed as scripted.